Con dos charm packs de la colección Aviary y Allspice Tapestry de Moda , fat quarters y restos de mi colección de telas, estoy montando este gran quilt todo de cuadritos ,excepto aquellos bloques que forman unas estrellas.
Después de una tarde entera colocando todos los cuadros ( 5"x 5" ) y recortar lo que iba necesitando , este es el resultado.
La composición la he ido haciendo sobre el suelo a fin de tener una visión general del conjunto y cambiar de sitio aquellos cuadritos que quedaban mejor en otro lugar.
Es algo mareante recolocar estos 192 trozos para componer el quilt que tendrá 66"x 84" después de añadir el borde....pero estoy deseando verlo sobre la cama acabado.
Ahora a unir todas las piezas.
Dos perfumadores más
De nuevo he aprovechado unos restos de bloques de un quilt romántico. A veces las medidas en el corte o en el cosido no han sido las correctas y he tenido que dejar el bloque más pequeño. Solución : utilizar una maravillosa lavanda segoviana ( gracias Cristi ) y hacer unos perfumadores para los cajones de la ropa.
Para hacerlos algo más diferente he cosido una puntilla en batista en ambos lados. Luego una estrecha cinta de raso doble para la lazada , dejando las puntas bien largas..... y arreglado.
La foto de la izquierda arriba es la trasera de cada uno.
Ya veis que en patch todo se aprovecha.
Para hacerlos algo más diferente he cosido una puntilla en batista en ambos lados. Luego una estrecha cinta de raso doble para la lazada , dejando las puntas bien largas..... y arreglado.
La foto de la izquierda arriba es la trasera de cada uno.
Ya veis que en patch todo se aprovecha.
Matilde House - luxury home
Matilde House designed by Ailtireacht Architects, located in Rathgar, Dublin.
Information from Ailtireacht Architects:
The existing two-storey return was at a scale not befitting such a large house with cramped internal dimensions making the spaces unusable. Traditionally, Victorian returns consist of a series of functional and subservient spaces to the mainhouse. The design exploits this premise, in the creation of a series of generously proportioned multifunctional spaces, accommodating the contemporary needs not afforded by a typical Victorian House, spaces envisaged for working, playing, bathing and sleeping. The functional materiality of the proposal is selected in response to the existing condition of unpainted render at the rear terrace and the subordinate functional spaces contained therein. View Matilde House detail [via] modern house design.
Labels:
luxury home design
,
modern house design
Tolo House - Holiday Home Design
Tolo House, a holiday home. Designed by Alvaro Leite Siza, located in Lugar das Carvalhinhas - Alvite, Cerva Parish, Ribeira da Pena Commune, Vila Real District.
Architects: Alvaro Leite Siza
Client: Luís Marinho Leite Barbosa da Silva
Location: Lugar das Carvalhinhas - Alvite, freguesia de Cerva, Ribeira da Pena District
Site Area: 1000 sqm
Constructed Area: 180 sqm
Contractor: Óscar Gouveia
Landscape: Alvaro Leite Siza Vieira
Materials: Concrete
Services: GOP
Project Start: 2000
Project Complete: 2005
Photographers: Alvaro Leite Siza / F&S Guerra
A holiday home with three bedrooms, a social bathroom, a living room, a dinning room, a small kitchen with a support washbasin, pantry, and even a small outdoor swimming pool.
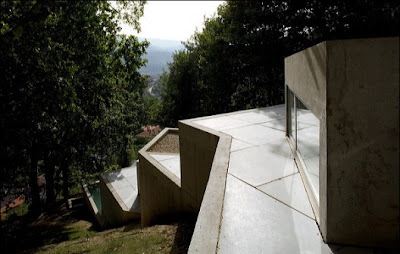
This road leads to the northern higher part of the lot. The roof functions simultaneously as pavement support for the gardens: similar to the traditional threshing floors and patios in the northern regions of the country with hilly terrain.
The terrain’s instability together with modest economic resources gave rise to a house with triple function: the home itself and its interior space; the organization of outdoor leveled patios corresponding to the roofs of various levels which permit the outdoor use of the garden; and finally, the creation of a pedestrian link between the paths of the upper and lower levels that border this lot. The exterior stairs that create a link between the patios mirror the interior stairs that have the same function of linking the designed compartments that are also developed through levels. In this way, the exterior stairs correspond to the interior ceilings.
source [via] modern house design.
Miniaturas rojas para cajón de imprenta
Estos son otros dos trabajos de vacaciones.
El primero es un alfabeto bordado 1/1 en 32ct color Ivory de Zweigart. El modelo es del libro " Rouyer, ses plus beaux motifs et alphabets anciens " de Veronique Maillard. Color 498 de DMC
El segundo con el mismo color de hilo y la misma tela pero bordado 2/2. El esquema es un freebie de Casa Mía
Aunque el cajón sigue sin restaurar , no quiero dejar de bordar pequeños motivos rojos que iré añadiendo, uno tras otro según vaya terminando.
Labels:
miniaturas
,
Punto de cruz
Tutorial Penggunaan Photometric IES Lights pada 3Ds Max
Akhirnya setelah dulu sempat ada yang request agar blog ini menampilkan tutorial pencahayaan pada program 3ds max, hari ini terwujud sudah, capek deh...
pada postingan kali ini kami ajarkan kepada anda tentang bagaimana cara menggunakan pencahayaan Photometric IES Lights pada 3Ds Max yang mana pencahayaan ini biasa di gunakan pada kebanyakan desain interior ruangan, selamat mengikuti...
1. Buka program 3ds max mu bukan program microsoft word (ya iya lah, he3x) atau siapkan desain interior yang ingin diberikan cahaya ies light bukan desain baju lebaranmu (ya iya lah, he3x) ,
lalu klik light - pilih photometric (lihat gambar dibawah)
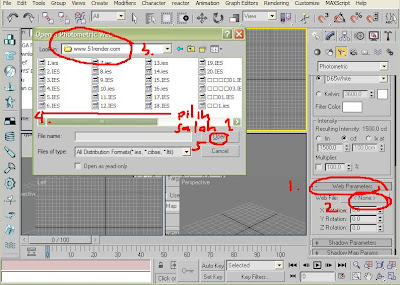
2. Klik pada tombol target point, lalu pada Intensity pada distribution pilih web (lihat gambar dibawah)
3. Buka rollout web parameter, lalu klik tombol none, lalu cari file ies light nya.. kalo belum punya download di www.51render.com , lalu pilih jenis ies light nya, lalu open (lihat gambar dibawah)
4. Rampung deh..
Picture Ies Light [via]
Labels:
Tips and Triks
,
Tutorial
House V - luxury home
Author: 3LHD
Project team: Sasa Begovic, Marko Dabrovic, Tatjana Grozdanic Begovic, Silvije Novak, Paula Kukuljica, Koraljka Brebric, Romana Ilic
Collaborators: UPI 2M (structural engineer), MR Konzalting (electrical engineering), Mario Josipovic, Ured avlastenog inzenjera strojarstva (MEP engineering - mechanical) Nenad Sutevski, Vodotehnika (electrical engineering), MAKRO 5 (pool systems)
General contractor: VD Gradenje
Project: 2001-2005
Construction: 2005-2007
Location: Dedici 63, Zagreb, Croatia
Site area: 3302m2
Gross floor area: 599m2
Footprint: 479m2
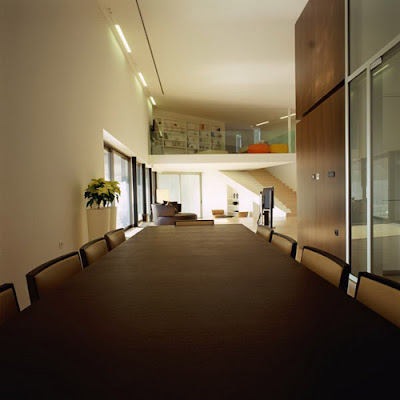
House “V” was designed in order to satisfy the needs of a family. The house is situated beneath Zagreb mountain Medvednica, on a relatively mild hill that stretches from south to east. The house is closed on the north side along the street and opens up into a large private garden thus creating a sense of intimacy for family life. The ground floor is intended for the common activities of the inhabitants, with a gradual staircase connecting the serene living area to private rooms on the first floor. Exits to the outdoor landscape are possible from the pool on the southern side, the porch area on the southeastern side, along the glass front of the living room and from the commercial part on northeast side. View V House detail [via] modern house design.
Labels:
Interior Design
,
luxury home design
En progreso.....
Crayon yang unik
Crayon memang sudah banyak saat ini dengan bentuk beragam
dan warnanya yang banyak, tapi adakah crayon yang satu
batangnya akan menghasilkan warna yang berbeda
Rich Colour Crayon adalah crayon yg memiliki warna yang
berbeda di setiap goresan dalam setiap batang crayon.
Jadi setiap kita menggoreskan crayonnya, akan keluar
warna yang berbeda, karena dalam satu batang, terdapat
campuran warna yang banyak.
Crayon ini sangat cocok untuk membuat sketsa atau gambar
lainnya. Dalam satu kotak terdapat 6 warna utama yaitu
hijau,ungu,coklat,biru,orange, dan merah.
Crayon ini dijual dengan harga sekitar Rp. 130.000
Video Tutorial Interaktif AutoCAD Membuat Gambar Kerja Vol. 2 Available Now
Melanjutkan tutorial sebelumnya yaitu Video Tutorial Interaktif AutoCAD Membuat Gambar Kerja Vol. 1 yang berisi video tutorial bagaimana cara menggambar denah, tampak depan, potongan,tampak samping,membuat KOP gambar, juga mencetak dengan skala, maka pada Video Tutorial Interaktif AutoCAD Membuat Gambar Kerja Vol. 2 ini berisi tentang bagaimana cara menggambar rencana pondasi, potongan pondasi, sanitasi, elektrikal, rencana atap, detail kuda-kuda dan lain2, monggo2 nek bade tumbas... klik disini untuk melihat tutorial yang lainnya, maturnuwun....
Labels:
Gambar Kerja
,
Info
,
Tutorial
Miniatura Petit Bouquet
Del libro Miniatures au point de croix de Francoise Prax, esta pequeña miniatura que terminé en vacaciones.
Hilo: DMC 498
Tela: 28ct Legacy Linen ( color crema )
Bordado 1/1
Este es uno de mis diseños preferidos, pero no el último. Espero bordar muchos de estos esquemas , todos en rojo.
Labels:
miniaturas
,
Punto de cruz
Guardando trocitos...
Hace algunas semanas que vi en en un blog una de las cajas IKEA en metal indicada para guardar las cosas pequeñas del baño. A mí me pareció monísimas con esos ramilletes esparcidos por toda la caja e ideal para guardar los pequeños trocitos de tela antes de montar un bloque de patch.
Dentro vienen muchas más cajitas en distintos tamaños....
Estos son restos que me habían quedado y que he cortado en pequeños triángulos de 5 cm de lado, preparados para ser cosidos y ordenaditos por colores......
Dentro vienen muchas más cajitas en distintos tamaños....
Estos son restos que me habían quedado y que he cortado en pequeños triángulos de 5 cm de lado, preparados para ser cosidos y ordenaditos por colores......
Es el modelo Flaten . En la pag web de IKEA de tu zona puedes consultar también si están en stock.
Mengatur Kalender Proyek Pada Microsoft Project 2007
Nek koe arep mengatur kalender proyek pada program Microsoft Project 2007 koe mesti akan mengalami kemumetan tenan ora ngapusi soale tampilane beda banget babar blas karo sek Microsoft Project 2003 atau versi sebelumnya, oleh karena itu, untuk menghilangkan kemumetan pada dirimu, berikut kami ajarkan bagaimana mengatur kalender proyek pada Microsoft Project 2007 yaitu seperti menentukan hari kerja menjadi 6x dalam seminggu, menentukan hari libur tertentu dan menentukan jam kerja hari jumat.
Perlu diketahui juga bahwa mengatur kalender proyek ini merupakan langkah awal ketika anda akan menjalakan microsoft project, jika ingin tahu langkah-langkah efektif dalam menjalankan microsoft project lihat artikel sebelumnya atau klik disini atau anda mau beli tutorialku po?, klik disini.. (he3x.. promosi meneh),
selamat mengikuti...
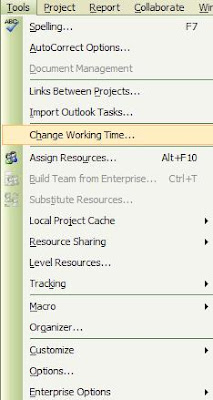
1. Buka program ms project 2007, lalu tekan menu tools - change working time (lihat gambar dibawah)
2. pilih Tab work weeks lalu klik detail (lihat gambar dibawah ini)
3. Jika ingin menentukan jam kerja 6x dalam seminggu, maka pilih hari sabtu (karena defaultnya hari sabtu libur) lalu aktifkan ceklist no 2 lalu isikan jam kerjanya, lalu OK (lihat gambar dibawah)
4. jika ingin mengatur jam kerja hari jumat, maka tinggal pilih hari jumat (friday) lalu aktifkan ceklist no 2 lalu isikan jamnya no 3, ok (lihat gambar dibawah)
Subscribe to:
Posts
(
Atom
)